Halloween is not only a time to go to haunted houses and watch scary movies. It also provides an occasion for spooky and deliciously sweet treats. Enjoy these easy-to-make recipes, especially perfect for this time of the year.
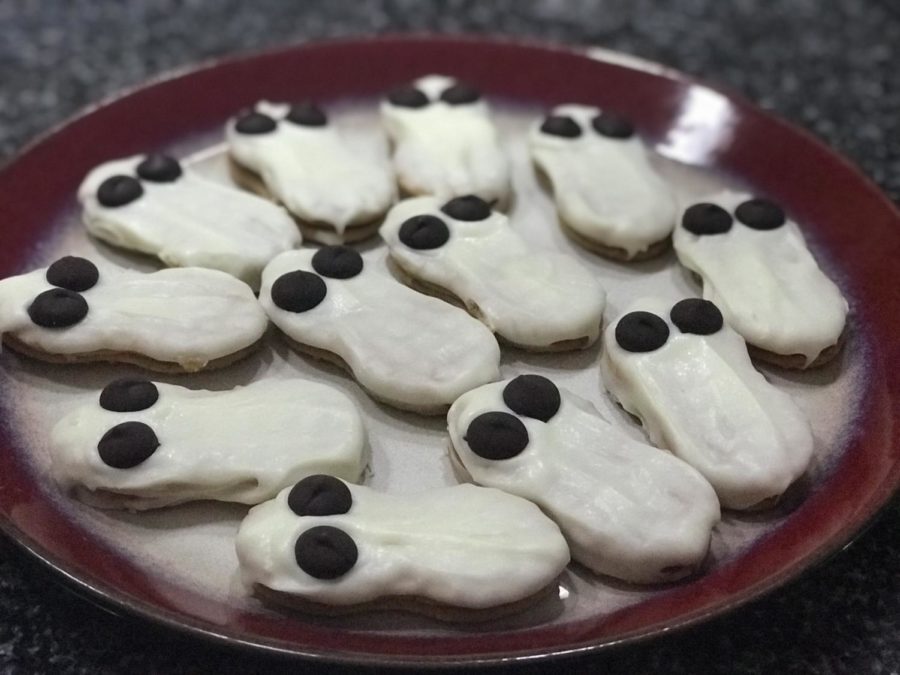
Nutter Butter Ghosts
Ingredients:
- Nutter Butter cookies (24 cookies)
- One bag of white chocolate chips
- One bag of semi sweet chocolate chips (mini)
Instructions:
First, melt the white chocolate morsels in a bowl, making sure to stir every ten seconds for even melting and to make sure the chocolate doesn’t burn. Next, submerge either one side or both sides of the Nutter Butter cookie in the white chocolate. Lastly, place 2 chocolate chips on the top to create eyes. Let them cool long enough that the chocolate hardens before serving. Putting them in the refrigerator for about 10 – 15 minutes will cool them completely.
Mummy Brownies
Ingredients:
- One box of brownie mix
- White chocolate melts
- Candy eyeballs
- Piping bag or Ziploc bag
Instructions:
Start by making the brownies according to the recipe on the box. After the brownies are finished baking, set them aside to cool. While the brownies cool, melt the white chocolate in the microwave, stirring every ten seconds to evenly heat the melts and to make sure they don’t burn. Next, pour the melted chocolate into an icing bag or into a Ziploc bag with one of the bottom corners cut off. Then, cut the brownies into rectangles of desired size. Finally, squeeze the white chocolate on each brownie in a zig-zag motion and immediately place the candy eyeballs into the chocolate. Put them into the fridge to set and then enjoy.
Frankenstein Rice Crispy Treats
Ingredients:
- One box of Rice Crispy cereal (if you do not wish to make your rice crispy treats by hand you can buy pre-made ones from the store.)
- One bag of marshmallows
- White chocolate melts
- Green, purple and black food coloring (for black color, you may use dark chocolate melts)
- Piping bag or Ziploc bag
Optional:
Wooden skewers and a foam board to hold up your treats for easier cooling.
Instructions:
Begin by melting the marshmallows in a buttered pan over medium heat (as instructed on the box). After marshmallows are completely melted, quickly pour the contents of the cereal box into the pan, mixing the ingredients together before the marshmallow has a chance to cool. Set them aside and let them cool. They are easier to cut into squares later if you let them cool on their own instead of putting them in the refrigerator.
After the treats cool, melt 2/3 of the chocolate melts in the microwave, stirring every ten seconds to evenly melt the chocolates and avoid burning. Split the melted mixture into two separate bowls and add green food coloring to one and purple food coloring to the other. Dip 2/3 of your treat into the green chocolate. This will be the head and the bottom section of your treat. Then, dip the other 1/3 side into the purple chocolate. Repeat these two steps for all of the treats.
After letting them cool, melt the dark chocolate melts or the white chocolate (after which add the black food coloring) and decorate to your liking, using a piping bag or a Ziploc bag with one of the bottom corners cut off. You can also add candy eyes or bolts to the neck. Finally, serve to all of your fellow monsters.
Bat/ Vampire Cake Pops
Ingredients:
- Cake mix of your choice and ingredients required to make the cake
- Nonstick pan
- Piping bag or Ziploc bag
- Small wooden skewers
- Nonstick wax paper
- Dark chocolate melts
- White chocolate melts or small candy eyes
- Small container of frosting
Optional:
- A foam board to help cool your treats
Start by gathering and mixing all of the ingredients for your cake. Bake your cake at the temperature and for the amount of time required by the recipe.
While your cake bakes, lay out a sheet of your nonstick wax paper. If you want to be extra cautious, add butter or a nonstick spray to the surface of your sheet before creating the wings. Melt the dark chocolate melts (or white chocolate and after melting add the black food coloring) in the microwave, stirring every ten seconds to avoid burning. Fill the piping bag or Ziploc bag with the melted chocolate and pipe the outlines of your wings onto the sheet. Note: if you do not feel confident in your drawing skills, place a sized template under the sheet for accurate tracing. After tracing, or drawing/piping the outline of your wings, fill in the gaps with chocolate and let them cool.
Remove cake from the oven and set it aside to cool. Using your hands, break up the cooled cake into small crumbles and add a small amount of icing to make them stick together. Roll the cake crumbles into balls, 1 inch to 2 inches in diameter. Insert wooden skewers.
Melt the dark chocolate melts or black-tinted white chocolate and dip the cake pops into the chocolate until completely covered. Repeat this step the your remaining cake pops. After letting your cake pops cool, remove the chocolate wings from the wax paper and place them into the sides of the cake pops. Next, place the eyes on the front of the cake pop. Finally, pipe the fangs onto the cake pops and allow them to cool before serving. Enjoy!